Medical Technology


Fundamentals of Hematology Cell Counts and Measurements (*)


Measurements and indices which define characteristics of circulating red blood cells are listed below. Click here for a discussion of Red Blood Cell indices and anemia classification.

Shape

Shape of RBCs may be determined by visual inspection of a stained blood smear through the microscope. Abnormally shaped cells are called poikilocytes, and usually a further descriptive term which defines the shape is added, i.e., sickle cells, elliptical cells, club-shaped cells, spherical cells, etc. Stained smears also contribute information concerning size (megalocyte, macrocyte, normocyte, microcyte) and hemoglobin content (hypochromia, normochromia, and hyperchromia) to the trained observer.


Red Cell Count (RBC)

This measurement is made with a microscope and a specially ruled chamber (hemacytometer). The RBC is recorded as millions of cells per cubic millimeter (Normal Ranges: males, 5.4 ± 0.8; females, 4.8 ± 0.6).


Packed Red Cell Volume (Hematocrit, Hct., PCV)

Hematocrit is the percent volume of whole blood occupied by red blood cells and is determined by centrifuging blood in special (hematocrit) capillary tubes. The percent of whole blood which is made up of red cells is determined (Normal Ranges: males 45.0 ± 5.0; females 42.0 ± 2.0).


Hemoglobin (Hgb or Hb)

Hemoglobin content of whole blood is determined by photometric methods and recorded as gm/dL. (Normal Ranges: males 16.0 ± 2.0; females 14.0 ± 2.0).


Mean Corpuscular Volume (MCV)

This index estimates mean volume of erythrocytes in femptoliters and is calculated as follows:

MCV (femptoliters) = [Hematocrit % x 10] / [RBC count (in millions/uL)]

Normal Range: 87 ± 5 femptoliters

Mean Corpuscular Hemoglobin (MCH)

This is the mean quantity of hemoglobin (picograms) found in each red blood cell. The index is calculated as follows:

MCH (picograms) = [Hemoglobin (in gm/dL) x 10] / [RBC count (in millions/uL)]

Normal Range: 29 ± 2 picograms

Mean Corpuscular Hemoglobin Concentration (MCHC)

This index is an estimation of the concentration of hemoglobin in an average RBC and is expressed as gm/dL. The index is calculated as follows:

MCHC (%) = [Hemoglobin(in gm/dL) x 100] / [Hematocrit (in %)]

Normal Range: 34% ± 2%


Differential White Cell Count

The differential white cell count (percent of the total contributed by each type of white cell) is determined by counting the number of each type found in a total of one hundred cells counted. A stained smear and a microscope are used. Normally neutrophils constitute 62%, eosinophils 2%, basophils 3%, monocytes 5%, and lymphocytes 30% of the circulating white cells.


White Blood Cell Count (WBC)

The number of circulating white cells is about 7500; however, this number is subject to wide variation. Indeed, white cell counts vary during the course of the day, and this variation is distorted by physiological responses to such things as exercise and temperature. Such factors must always be weighed before consideration of significance is assigned to minor variations in WBC counts.


PROCEDURES:

Cell Counts

Both RBC and WBC counts require a hemacytometer (Hemocytometer), microscope and special pipettes for diluting blood.

Diagramed above: Hemocytometer
< Pictured at left: Hemocytometer, RBC pipette, WBC pipette and Sahli pipette.


PREPARING PIPETTES AND HEMACYTOMETER

The RBC pipette is identified by the red bead in the bulb, and the WBC pipette by the white bead in the bulb. Both are cleaned as follows. Attach the devices provided to the end of a pipette. Rinse (fill and empty) the pipette thoroughly by drawing and expelling a dilute bleach mixture (2.5%) several times. Repeat this procedure substituting distilled water as a rinse. Next, alcohol (95%) is used for two rinses. Finally, acetone or ether is used for two rinses. Air is then forced through the pipette until it is dry.

The counting chamber and cover slip must also be clean and dry. The polished surfaces and rulings are easily scratched, so lens paper moistened with the above solutions is used for cleaning. The entire chamber and cover slip are then lightly dried with lens paper.

MAKING A FINGER PUNCTURE

Cleanse the tip of the finger with a piece of cotton which is saturated with 70% alcohol. The finger should be scrubbed thoroughly, since this not only cleans the finger, but also produces hyperemia (increased flow of blood to the area). Let the finger air dry. Using a sterile, disposable lancet, quickly make a single puncture in the top of the cleansed finger (hold firmly between the thumb and forefinger) deep enough so that blood flows freely from the wound. Wipe off the first drop of blood with a piece of cotton; when a second drop has accumulated, proceed with the filling and diluting of both a red cell pipette and a white cell pipette. DO NOT FILL THE RBC AND WBC PIPETTES WITH BLOOD UNTIL SUFFICIENT BLOOD HAS WELLED UP ON THE FINGERTIP TO FILL THE RESPECTIVE PIPETTE TO THE REQUIRED LEVEL SINCE THESE PIPETTES HAVE A VERY SMALL BORE AND BLOOD CLOTS EXTREMELY EASILY IN THEM. The finger must not be squeezed.


FILLING AND DILUTING THE HEMACYTOMETER

Attach the device you just used to clean the pipettes to the end of a clean, dry, red blood cell diluting pipette. Place the pipette tip just within the edge of the drop of blood or into the blood sample drawn for your table. Draw blood up in the tube to the 0.5 mark on the pipette by rotating the plunger control knob. (The pipette may actually fill by itself through capillary action and a little beyond the desired mark, it may be drawn back by touching the top of the pipette to a piece of moist gauze.) Wipe the excess blood from the tip of the pipette. Immerse the pipette tip in the red cell diluting fluid (Gowers' solution); and while holding the pipette vertically, draw the diluting fluid exactly to the 1.01 (101 on some) mark. Dilution should be done very quickly and precisely to prevent clotting of the blood and to insure accuracy. If the pipette is then kept in a horizontal position, the fluid will not run out. Remove and pipette from the holder and mix the contents of the pipette vigorously with a figure-of-eight motion. Shaking with an endwise movement will force the contents into the capillary portion of the pipette stem and cause improper dilution. Thorough mixing of the contents will require 2 minutes of shaking. If blood is being used from a finger puncture, therefore, after the dilution has been accomplished, the pipette should be handed to another member of the group for shaking and the white blood cell pipette filled while the subject's finger still bleeds.

The white blood cell pipette is filled with blood to the 0.5 mark in an identical manner and then filled to the 11 mark with a different fluid (2% v/v acetic acid). Mixing is accomplished just as with the red cell pipette. The counting chamber (hemacytometer) is conveniently located on the microscope stage. Place the cover slip over the counting area with the edge resting on the cover glass supports. Shake the pipette again to insure adequate mixing. Expel the fluid from the lower stem of the pipette and wipe the tip. Place the tip of the pipette exactly at the junction of the cover glass and the chamber. The capillarity of the space between the cover glass and the chamber will immediately pull fluid from the pipette to fill the chamber. If the fluid spills into the moats or should bubbles form under the cover slip, the chamber will have to be cleaned and the procedure repeated.


RED CELL COUNT

The adjacent figure shows the rulings (improved Neubauer) which are inscribed on the counting chamber. The smallest squares in the large center square (where red cells are counted) have an area of 1/400 mm and are arranged in groups of 16. Each group of 16 squares is set off from the others by triple lines. The middle line is the one which actually defines the area of the squares adjacent to such a triple line. The inner line, therefore, is included within the area of the square.

Erythrocytes in five of the 25 groups of 16 small squares are counted. These groups are the four corner groups and the one in the center. Count all the cells which touch the upper and left boundary lines (middle of the three lines) of the squares, but do not count those which touch the lower and the right boundary lines.

A period of 2 to 3 minutes after filling allows the red cells to settle to the bottom of the chamber so that they will be in focus. Examine the chamber at 100X magnification for evenness of the red blood cell distribution. Turn the 40X objective in place; focus and count the cells in the designated squares.


RED CELL COUNT - Count the five(5) small squares indicated by "R". Each of those squares contain 16 smaller squares. Use high power magnification (400X).

WHITE CELL COUNT - Count the four(4) large corner squares indicated by "W". Each of those squares contains 16 smaller squares the same size as one of the red cell squares. Use low power magnification (100X).
The volume of fluid in the portion of the hemacytometer which was counted is:

1/400 mm2 (area of smallest square) x 16 (no. of squares/group) x 5 (no. of groups counted) x 1/10 mm (depth of chamber) = 0.02 mm3. The cells counted, therefore, in 0.02 mm3 x 50 equals the number of cells in 1 mm3.

Before being placed in the chamber, blood was diluted by a factor of 200. The number of red cells in 1 mm3 whole blood, then, equals 50 (volume factor) x 200 (dilution factor) x the number of cells counted. If the RBC is reported as millions of cells/mm3, dividing the number of cells counted by 100 is the only calculation required, e.g, if 534 cells were counted, the RBC count would be 5.34 (millions of cells/mm3).


WHITE CELL COUNT

The chamber must be cleaned and dried and the white cell pipette shaken again to thoroughly mix the diluting fluid and blood.

The diluting fluid is 2% v/v Acetic acid solution. It lyses the red cells, leaving only the WBC visible. The chamber is filled in exactly the same manner as for the red count. White cells are, however, counted in the four large outside squares. These squares each have an area of 1 mm2 so that the total area counted is 4 mm2. Again cells touching the upper and left-hand boundary lines of the main squares are counted, while those touching the lower and right-hand boundary lines are not counted. Count at 100X magnification.

The white cell count is reported as cells/mm3 and is calculated from the same general relations which were given for the red cell count calculation. In this instance, however, areas of the squares are 1 mm2, and the dilution factor is 20. Depth of the chamber remains 1/10 mm. The volume of fluid is 1 mm2 (area of one square) x 4 (no. of squares counted) x 1/10 (depth) or 0.4 mm3.

WBC (cells/mm3) = Cells counted x 20 (=dilution factor) / Volume (=0.4 mm) = Number of cells counted x 50.


HEMATOCRIT

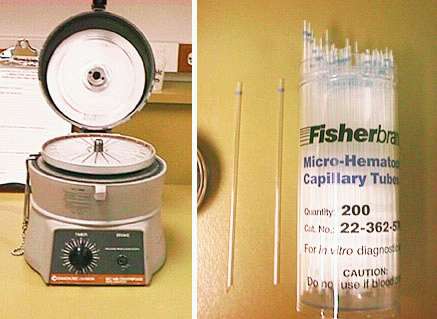
Touch the end of a heparinized, capillary hematocrit tube to the edge of the blood sample and allow the tube to fill three-fourths full. Tilt the tube to leave both ends free of blood.

Seal one end of the tube with clay furnished with the tubes. Centrifuge for 5 min. at 10,000 RPM in a micro-hematocrit centrifuge, or for 30 min. at high speed in a regular single head centrifuge.

After centrifugation, determine the hematocrit by measuring both the total height of blood and plasma and the height of the blood cell column (ignore the white buffy layer) to the nearest 1/2 mm. The hematocrit is calculated by:
Microhematocrit centrifuge and non-heparanized capillary tubes

Hct (%) = [Height of Packed Red Cells (mm) x 100] / [Height of Packed Red Cells and Plasma (mm)]


HEMOGLOBIN DETERMINATION

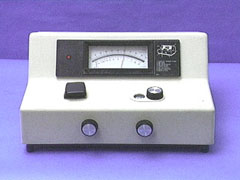
Draw 20 mm3 of blood into a Sahli pipette. Expel this blood into a test tube containing 5.0 ml of Drabkin's reagent. Rinse out the pipette twice with the Drabkin's reagent. Mix the contents using the vortex mixer. Determine the absorbance for this solution using the Spectronic 20 at 540 nm. Using the standard Hb curve, determine the Hb concentration of your blood.

< Spectronic-20 spectrophotometer


WBC DIFFERENTIAL CELL COUNT

>
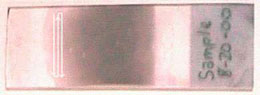
The WBC differential begins with preparation and staining of a blood smear. To prepare the smear place a small drop of blood on the surface of a clean microscope slide near the end; using a second
microscope slide as a spreader held at 30-40 degrees, touch its end to the edge of the blood drop and push it toward the opposite end of the slide - the blood will be drawn into the acute intersection of the slides and will be "pulled" across the slide (see illustration). Allow the smear to air dry for about 5 minutes.

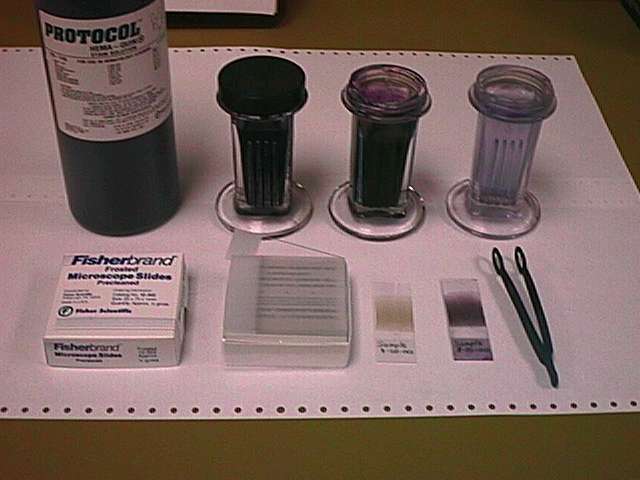
To stain the smears place the smears in Wright's stain for 3 minutes, transfer to water or phosphate buffer (pH 6.2) for 3 minutes and then briefly rinse with water. Place the slide in a vertical support and allow to air dry.


< Simple Wright's stain setup for staining blood smears

Note the unstained and stained blood smears in the photo's foreground.

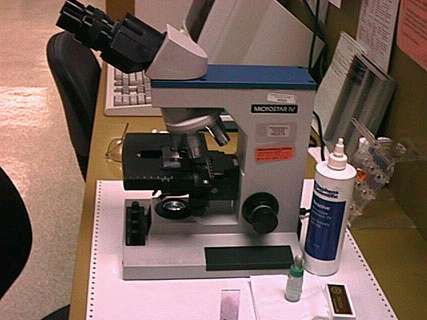
Mount the stained blood smear on the microscope stage and examine at 400X magnification. Locate a region in the "feather" end of the smear where the RBCs are neither too difuse nor overlapping.

< Binocular microscope for blood smear exams

  
Feather regions: too thin, just right, too thick

The trained observer will gather much more qualitative information about a blood specimen than the mere relative numbers of WBC types. For example, hemoglobin, platelet count, total WBC count and RBC count may all be estimated and used for confirmation of other hematological findings. Anemias, leukemias, thrombocytosis, thrombocytopenia, erythroblastosis and some blood parasites may be detected by morphological examination of the smear. Switch to 1000X magnification and begin at one edge of the "feather" end of he smear (experienced observers can distinguish most cells at 400x magnification). Before beginning the differential examine and comment on adequacy and quality of platelets and appearance of size and chromaticity of RBCs. Look for abnormal features such as giant platelets, abnormal size and shape of RBCs, nucleated RBCs, abnormal RBC inclusions, atypical or reactive lymphocytes and immature WBCs.

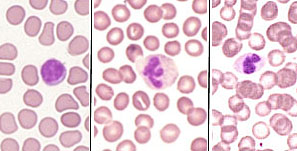
Following the path illustrated at right, count the first 100 WBC encountered, classifying them by cell type and maturation. The tally is kept on a multichannel counter specifically designed for WBC differential counting. Do not include ruptured or incomplete cells (In the jargon of the trade, such cells are known as "skip-o-cytes").


(* Much of this text comes from the Biology Department's Mammalian Physiology Lab of the University of Michigan at Flint. Several technical errors have been corrected, and the whole has been supplemented with appropriate graphics.)

Hematology/Hemostasis

Search THIS ENTIRE WEB SITE for CLS technical, financial or other data >>>

PicoSearch

E-mail Irving This page is made entirely from recycled electrons.  Any similarity between this and any other page may be completely intentional.  Not tested on animals.  Void where prohibited.   Return to Irving's Home Page